Ever spent hours lost in Logic Pro, clicking around like you’re searching for loose change in a couch? Chris Sangster—aka sangstersounds—just dropped a video that’ll slap your workflow awake. He’s digging into Logic Pro’s toolbar, that overlooked strip up top that most folks ignore for years (guilty as charged). If you’re tired of menu-diving and want to make beats faster than your pizza gets delivered, this one’s for you. Chris’s LA studio vibes and no-nonsense tips make this a must-watch for anyone who wants to stop fighting their DAW and start making music that actually grooves.
4. January 2026
RILEY
Chris Sangster’s Logic Pro Toolbar Breakdown: The Secret Sauce You’ve Been Sleeping On
The Hidden Gem: Logic Pro’s Toolbar
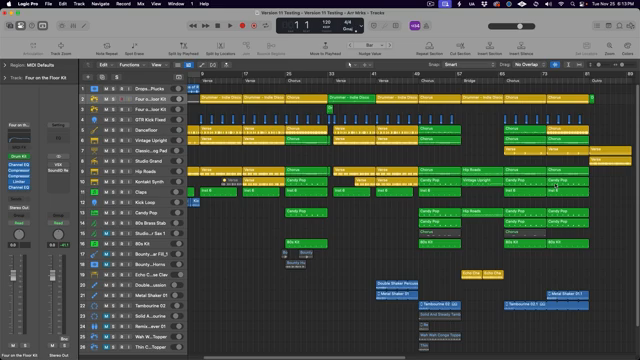
Let’s be real—most of us have been using Logic Pro for years without ever noticing that sneaky little toolbar hiding up top. Chris Sangster kicks things off by admitting it took him five years to even realize it existed. That’s like finding out your apartment has a second bathroom after you’ve already moved out. The toolbar lives just above the control bar and can be summoned with a click or a three-finger salute (Ctrl + Option + Command + T, if you’re feeling fancy).
What makes this toolbar special? It’s basically a shortcut buffet for all those editing, MIDI, and project functions that usually require a scavenger hunt through menus or remembering keyboard shortcuts. Chris points out that while you could get to these features elsewhere, having them all laid out in one spot is a serious workflow flex. If you’re tired of menu-diving every time you want to split a region or bounce a track, this toolbar is about to be your new best friend.
"It probably took me a good five or so years of using Logic Pro before I even learned about it."
© Screenshot/Quote: Sangstersounds (YouTube)
Speed Demons: Tools That Turbocharge Your Workflow
Chris doesn’t just show off the toolbar—he breaks down why it matters. Knowing what each tool does means you can stop fumbling and start flying through your sessions. He’s quick to call out that some functions (like Bounce Project or Import/Export) are easier to access with keyboard shortcuts, but there are plenty of gems here that can seriously speed things up.
From splitting regions by playhead or locators to removing silence with a single click, the toolbar is stacked with options. Chris is brutally honest about which ones are worth your time and which are just taking up space. He even dives into group settings and the group clutch feature, showing how you can link or unlink tracks for editing in a snap. Bottom line: if you want to make more music and less mouse-clicking, knowing your way around these tools is key.
Make It Yours: Customizing the Toolbar
Here’s where things get spicy. Chris shows that you’re not stuck with the default toolbar—right-click any blank space and you can customize which of the 31 available functions show up. It’s like building your own beat menu: keep what you love, ditch what you don’t. Tick boxes let you tailor the toolbar to your exact workflow, so you’re not wasting time scrolling past tools you never use.
He’s got opinions, too. Some features, like color palette or zoom commands, are easier to hit with shortcuts, but if you’re a visual learner or just like having everything in your face, you can load up the toolbar with whatever you want. Chris’s advice? Build it to fit your style, not someone else’s. That’s the real cheat code for getting faster in Logic.
Next-Level Moves: Automation, Note Repeat, and More
"First up, automation quick access, a fairly under discussed feature of Logic Pro, but a super helpful one that allows you to assign one MIDI fader or knob to control any automation parameter you set up."
© Screenshot/Quote: Sangstersounds (YouTube)
Now we’re cooking with gas. Chris dives into the advanced features hiding in the toolbar, like Automation Quick Access—a sleeper hit that lets you control any automation parameter with a single MIDI fader or knob. If you’re into hands-on tweaking, this is a game-changer. He also covers the articulation button for switching up instrument sounds on the fly, and the infamous Track Zoom (which he calls one of Logic’s most annoying features—preach).
But the real sauce is in the MIDI tools. Note Repeat lets you hold down a key and spit out hi-hat or synth patterns faster than you can say “trap beat.” You can even change rhythm, velocity, and gate in real time using your mod wheel, aftertouch, or pitch wheel. And if you mess up? Spot Erase lets you delete notes on the fly, straight from your MIDI keyboard. These aren’t just party tricks—they’re workflow weapons for anyone who wants to get creative without getting bogged down in menus.
The Ultimate Guide: For Rookies and Pros Alike
Chris wraps things up by pitching his free Logic Pro Optimization Guide, but the real takeaway is how this video serves both newbies and seasoned Logic heads. He’s not just rattling off features—he’s showing how to actually use them to make your sessions smoother and your beats tighter. From niche tools like Crop and Stretch to Locators, to arrangement power moves like Repeat Section and Insert Silence, there’s something here for everyone.
If you’re the type who likes to learn by watching, Chris’s style is super approachable—no tech jargon, just real talk and practical hacks. And let’s be honest, some of these tricks are way easier to see in action than to read about. So if you want to stop fighting Logic and start making it work for you, this video is the cheat sheet you didn’t know you needed.
"The first thing to know about these functions is that the section of the project they work on is determined by the cycle range."
© Screenshot/Quote: Sangstersounds (YouTube)
This article is also available in German. Read it here: https://synthmagazin.at/chris-sangster-und-die-logic-pro-toolbar-das-geheime-workflow-upgrade-das-du-verpasst-hast/
Watch on YouTube:
Latest articles
Watch on YouTube:
Visit the channel:
https://www.youtube.com/sangstersounds
https://www.youtube.com/sangstersounds
Links from sangstersounds:
FREE DOWNLOADS!: https://linktr.ee/sangstersounds
Website: https://sangstersounds.com
Instagram: https://instagram.com/sangstersounds
Sponsored links:
If you purchase via these links, we may earn a small commission – at no extra cost to you. The link opens an Amazon keyword search, and results may vary depending on availability.
Logic Pro
🔗 Check price on Amazon
🔗 Check price on Amazon